
In my previous post, I discussed many of the Private Cellular changes that are available with the release of iOS17 and iPadOS17. There was one new feature that I hadn’t figured out how to use yet that relates to Mobile Device Management (MDM) configuration changes. I linked to Apple’s documentation, but unless you work extensively with Apple, that documentation can be a little confusing. Luckily, I work with school districts that use a ton of Apple products and figured out how to roll out these settings to Apple iPhone and iPad devices running iOS17 and iPadOS17.
Celona, shortly after my previous blog post, had a webinar where an Apple Engineer showed off some of these settings. They also announced integrations with JAMF MDM for directly deploying their eSIMs to Apple Devices. I hope other vendors follow suite with that level of integration.
Sadly, I was on a cruise ship at the time of the webinar, and the recordings of the demo were not released. That left me to figure out how to use these settings. Luckily, they released the slides and in those slides are linked to two additional Apple documents:
https://support.apple.com/en-lamr/guide/deployment/depac6747317/1/web/1.0
https://developer.apple.com/documentation/devicemanagement/cellularprivatenetwork
When I first heard that Apple was releasing better integration for Private Cellular Networks and MDMs, I was expecting MDM manufactures to just enable a setting within their programs. Looking at the above documentation, I soon realize that isn’t required. The MDM companies may eventually add these specific settings, but we can use them right now with any of the MDM companies. You don’t even need an MDM to deploy these settings for testing purposes or small installs.
As a quick side note:
Only one Private Cellular Network payload is supported at a time, and the eSIMs or physical SIM must be installed first before they can be managed.
Creating .mobileconfig Files
To enable these settings it requires creating a single XML file that has a .mobileconfig extension. Anyone who does lots of work with Apple iOS and iPadOS devices with an MDM will know about .mobileconfig files. Apple Configurator can be used to create .mobileconfig files or you can create your own with a text editor. You can add these settings to other .mobileconfig files to install multiple settings at once.
Apple Configurator, like the MDMs, doesn’t have these setting specifically so you have to add them with a Text Editor. Selecting Cellular in Apple Configurator only allows you to set the APN settings. This is useful but not the settings we are wanting.

Custom XML Files
To create the XML files you need to open a Text Editor that doesn’t add additional data to the file. On a Mac, I’m using Zed or TextEdit. On Windows, Notepad or Notepad++ are my two go to programs.
Create a new file with the following content:
<?xml version=”1.0” encoding=”UTF-8”?>

<!DOCTYPE plist PUBLIC “-//Apple//DTD PLIST 1.0//EN” “http://www.apple.com/DTDs/PropertyList-1.0.dtd”>

<plist version=”1.0”>
<dict>
    <key>PayloadContent</key>
    <array>
        <dict>
            <key>PayloadDescription</key>
            <string>GeofenceData</string>
            <key>PayloadContent</key>
            <array>
                <dict>
                    <key>DataSetName</key>
                    <string>GXC Onyx</string>
                    <key>VersionNumber</key>
                    <string>1.0</string>
                    <key>CellularDataPreferred</key>
                    <true/>
                    <key>EnableNRStandalone</key>
                    <false/>
                    <key>Geofences</key>
                    <array>
                        <dict>
                            <key>Latitude</key>
                            <real>40.39069679445573</real>
                            <key>Longitude</key>
                            <real>-111.64585429652716</real>
                            <key>Radius</key>
                            <real>100</real>
                            <key>GeofenceId</key>
                            <string>FirstGeofence</string>
                        </dict>
                        <dict>
                            <key>Latitude</key>
                            <real>37.67357299087807</real>
                            <key>Longitude</key>
                            <real>-112.15652915697508</real>
                            <key>Radius</key>
                            <real>1000</real>
                            <key>GeofenceId</key>
                            <string>SecondGeofence</string>
                        </dict>
                    </array>
                </dict>
            </array>
            <key>PayloadIdentifier</key>
            <string>io.gxc.cellularprivatenetwork</string>
            <key>PayloadType</key>
            <string>com.apple.cellularprivatenetwork.managed</string>
            <key>PayloadUUID</key>
            <string>1d6d6912-708e-441a-9272-526ef05bbe3c</string>
            <key>PayloadVersion</key>
            <integer>1</integer>
        </dict>
    </array>
    <key>PayloadDisplayName</key>
    <string>GXC ONYX</string>
    <key>PayloadIdentifier</key>
    <string>io.gxc.plteprofile</string>
    <key>PayloadType</key>
    <string>Configuration</string>
    <key>PayloadUUID</key>
    <string>9BC4AF4B-11E1-4DE5-88F8-30EA82457CDD</string>
    <key>PayloadVersion</key>
    <integer>1</integer>
</dict>
</plist>
Then save the file as something like PrivateCellular.mobileconfig but make sure your Text Editor doesn’t add an additional extension such as .txt to the end.
Once you have the created .mobileconfig and edit the settings to your desired configuration, you can push that to iOS and iPadOS 17 devices using an MDM, Apple Configurator, or installing it manually.
Let’s dig into what the specific settings do.
DataSetName and PayloadDisplayName
<key>DataSetName</key>
<string>GXC ONYX</string>
<key>VersionNumber</key>
<string>1.0</string>
This sets the referenced Name and Version of the setting. This is useful to know which Private Cellular Network is configured and track changes.
<key>PayloadDisplayName</key>
<string>GXC ONYX</string>
The PayloadDisplayName setting provides a display name when the configuration is installed. I’ll refer to both of these later when we install the custom profile.
Cellular Data Preference
<key>CellularDataPreferred</key>
<true/>
The CellularDataPreferred key setting tells the device whether to use the Private Cellular data even when connected to Wifi or not. If a device has connectivity to both a Private Cellular network and a Wifi network, this setting tells the device to use the Private Cellular network for data.
This idea has origins going back to the iPhone 3G where Apple limited updates and video when run on 3G and then 4G networks. This setting brings the same idea to 4G and 5G Private Cellular networks. As we all know, Carriers would limit data and charge extra for going over, so Apple made iOS require Wifi for certain things such as App Store Updates. This settings tells the iPhone or iPad that the Private Cellular network can be used to prefer cellular data over Wifi.
This becomes very useful when you have an application running on an iPhone or iPad that needs to use the Private Cellular network for the application data but the device is configured for Wifi networks or needs other resources on the Wifi network such as AirPlay.
Organizations with private 5G and LTE networks have the option to prefer using cellular over Wi-Fi when both are available. With this setting, supported devices can be set to prefer the private cellular network, while still allowing Wi-Fi for services such as AirDrop and AirPlay.
5G NR Standalone
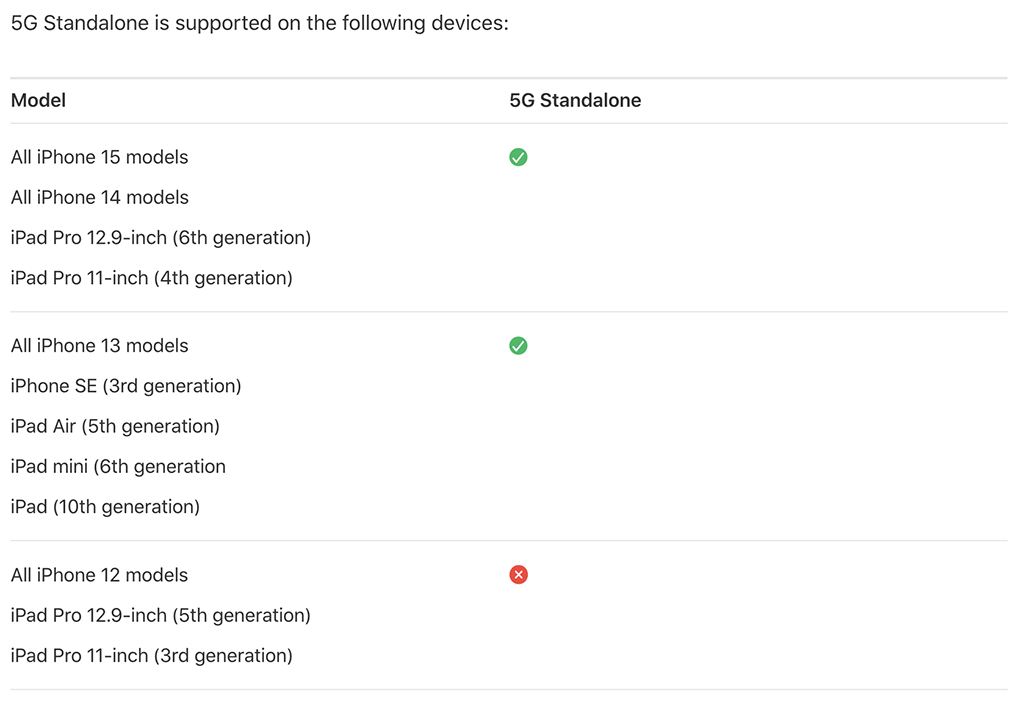
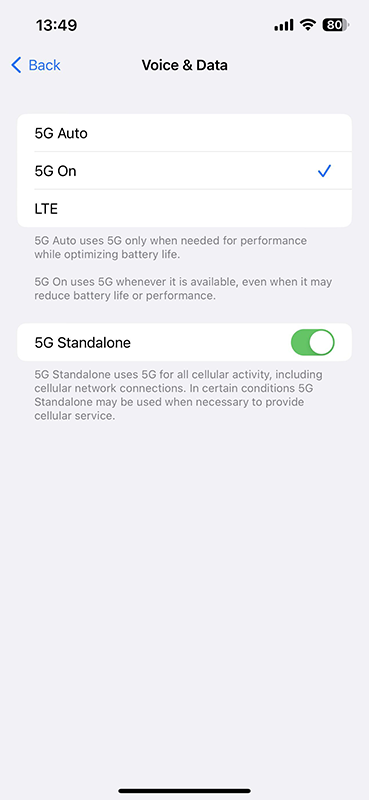
5G SA is turned off by default, and users can manually turn it on in Settings > Cellular. Additionally, organizations can use the new
EnableNRStandalonekey in their Private Cellular Network payload.
<key>EnableNRStandalone</key>
<false/>
The key EnableNRStandalone field has <false/> or <true/> option as the only setting. On iPhones and iPads 5G NR SA (Standalone) is disabled by default. This setting enables 5G SA across your devices and allows devices to connect to a 5G NR SA Private Cellular network.
For 5G NSA (Non-Standalone) with LTE and 5G, or just 4G LTE, then setting this on your Apple devices will allow your devices to join the 5G SA network if it is available, but the device can still rollback to 5G NSA or 4G LTE.
Geofence
On iOS17, currently iPhone ONLY, the Geofences key allows you to set a Geofence for a device so it will automatically switch between a Public Cellular network and a Private Cellular network for data when a device enters or leaves specific Latitude and Longitude coordinates. You can configure up to 1000 Geofence coordinates in a .mobileconfig file. In the XML file you set it with the following tags:
<key>Geofences</key>
<array>
    <dict>
        <key>Longitude</key>
        <real>40.39069679445573</real>
        <key>Latitude</key>
        <real>-111.64585429652716</real>
        <key>Radius</key>
        <real>100</real>
        <key>GeofenceId</key>
        <string>FirstGeofence</string>
    </dict>
    <dict>
        <key>Latitude</key>
        <real>37.67357299087807</real>
        <key>Longitude</key>
        <real>-112.15652915697508</real>
        <key>Radius</key>
        <real>1000</real>
        <key>GeofenceId</key>
        <string>SecondGeofence</string>
     </dict>
</array>
For each Geofence, you distinguish them with the GeofenceId key then a following string. You can name each Geofence such as <string>Building 1</string>, <string>Building 2</string>, etc. You can configure up to 1000 Geofences.
Within the Geofence settings you set a Latitude key within the <real> tags and a Longitude within the <real> tags. Then you set the Radius key with the <real> tags to tell it how far around the Latitude and Longitude coordinate to enable the Geofence. It is recommended to use a Geofence is slightly bigger than the expected radius.
The Radius <real> tags hold a radius in meters with 100 meters being the smallest possible area and 6.5 kilometers (about 4 miles) being the biggest. So the smallest Geofences are only allowed at a minimum of 100 meters. The device shouldn’t drop a connection to a public carrier network if the private cellular network is unavailable inside the Geofence.
A private network eSIM or physical SIM can automatically be turned on when entering cellular network coverage defined by a geofence, using the new
Geofencesdictionary with theGeofenceId,Latitude,LongitudeandRadiuskeys.By creating a geofence, the iPhone can seamlessly switch between a private network SIM and a carrier SIM as the user moves in and out of private network coverage. When they enter the geofence, the private network SIM is enabled, and it’s automatically disabled when they exit the geofence and leave private network coverage. This feature is available only when using a single private network eSIM or physical SIM on their iPhone. Both the private network SIM and carrier SIM should be installed before assigning a geofence.
Geofences are useful to handle issues that arise when using the Shared Home Network Identity (SHNI) 315-010 in CBRS. When an Apple device attempts to connect to a Private Cellular network, it first attempts to use the MCC-MNC (another name for an Home Network Identify) number to find a network.The device takes the SHNI plus the TAC to create the Tracking Area Identity (TAI). It is then supposed to use the TAI to identify the network and know to join or not but this doesn’t always work as TACs can overlap.
In the CBRS world, everyone uses the the same 315-010 SHNI. This can cause issues when an Apple device attempts to connect to a neighbor CBRS network using the same SHNI and receives a reject because it isn’t authorized to join. Using Geofences, you can tell the device to connect to the CBRS SHNI only when within a geographical area and not connect to other CBRS networks that it is not authorized to join. Geofencing is currently only available on the iPhone though.
Deploying .mobileconfig Files with MDM
Most Apple based MDM programs have an option to deploy a custom .mobileconfig profile.
Mosyle MDM
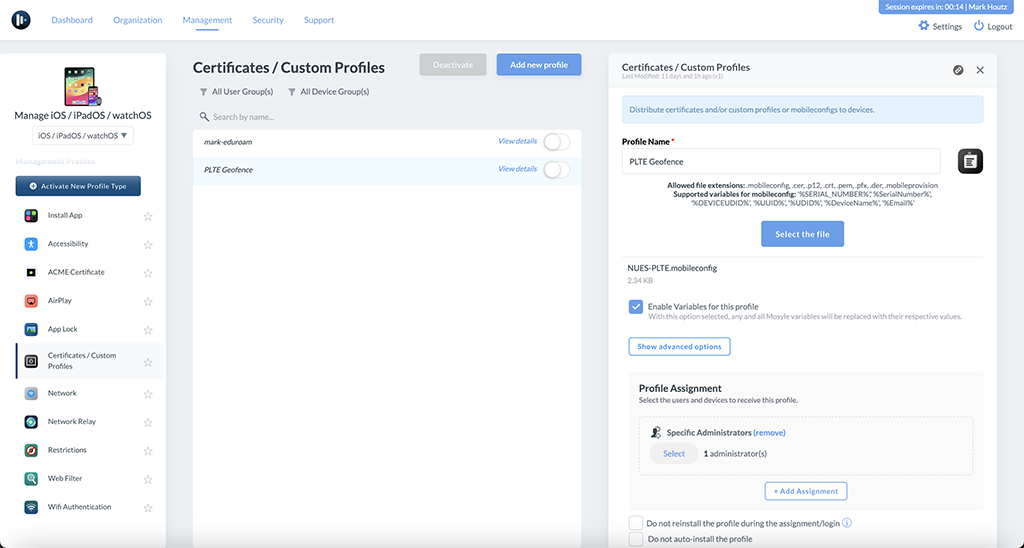
Select the Management tab along the top or bottom depending on the version (Mosyle Business or School) you are using. (The rest of the settings are the same between versions.)
Make sure you have iOS/iPadOS/tvOS selected in the drop down. Then select Certificates/Custom Profiles on the left hand side and click Add new profile.
Once you have the screen above, click the Select the file blue button on the right and select the .mobileconfig file created previously. Apply the new profile to whichever devices you want it to be installed on. I have it applied to my Administrator account in the screenshot above. Then click save and the profile should deploy to the assigned devices. You can verify the profile installation under the Setting app -> General -> VPN and Device Management -> Configuration Profiles. There should then be a new profile listed that was installed with the MDM.
Jamf Pro MDM
In Jamf Pro, select Devices -> Configuration Profiles then click the Upload button on the top right. Select the .mobileconfig file created previously, then click upload. Then apply the new Configuration Profile to the desired scope of devices.
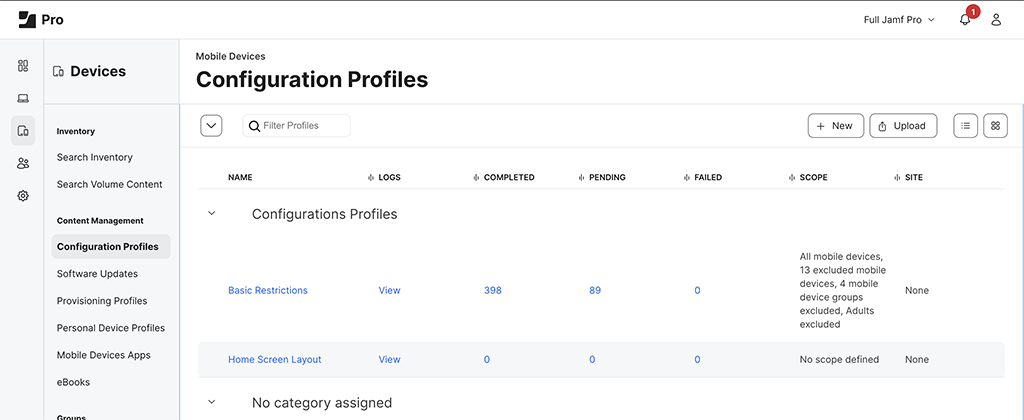
Like Mosyle above, it should then install the Configuration Profile to the scoped devices that you can check by going to the Setting app -> General -> VPN and Device Management -> Configuration Profiles. There should then be a new profile listed that was installed with the MDM.
Jamf Now
Jamf Now is similar to Jamf Pro above with more limited setting options. Select Blueprints -> Create New Blueprint -> Custom Profiles -> Add a Custom Profile -> then select the .mobileconfig file. You then need to apply the Profile to devices by selecting Devices -> Add a Device.
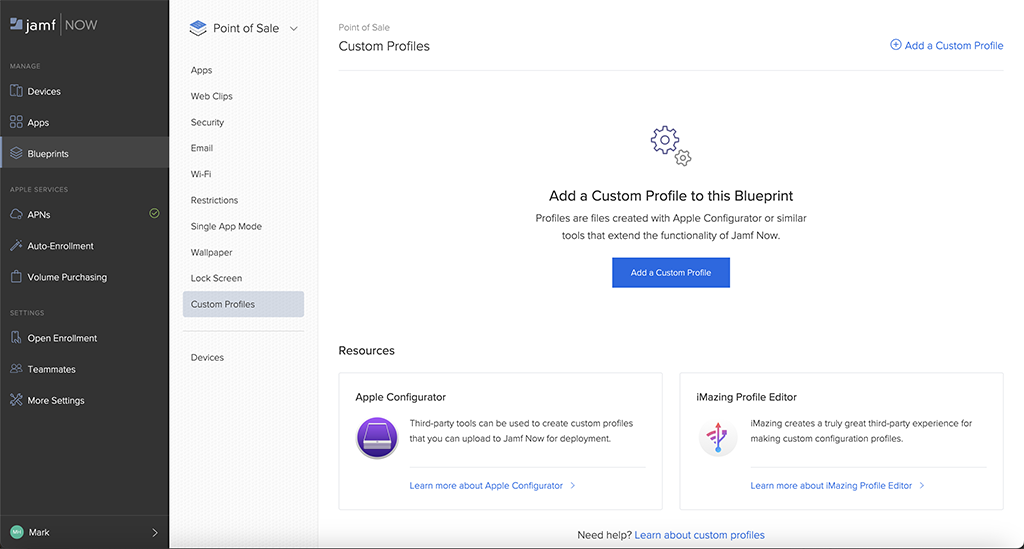
Just like both Mosyle and Jamf Pro, the profile should then be installed on the Apple device and you can check if it was successful by going to the Setting app -> General -> VPN and Device Management -> Configuration Profiles. There should then be a new profile listed that was installed with the MDM.
Installed Device Profile
As mentioned above, on the iPhone or iPad select the Setting app -> General -> VPN and Device Management -> Configuration Profiles. There should then be a new profile listed that was installed with the MDM. Click on the new profile will look like the screenshots below.
Notice the “Contains” section says “Cellular Private Network Profile“. We are not signing the above file. If you have the appropriate certificates, you can sign the custom .mobileconfig profile by including those in the file. I don’t have those certificates; so, I’m installing an unsigned version.
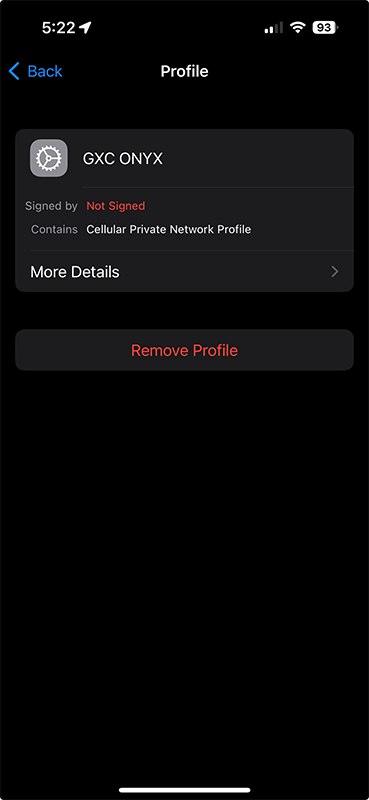
The title “GXC ONYX” comes from the XML code in the .mobileconfig file. At the bottom of the XML is the following code that sets the Display Name of the Profile.
<key>PayloadDisplayName</key>
<string>GXC ONYX</string>
When you click the “More Details” button you get the below settings.
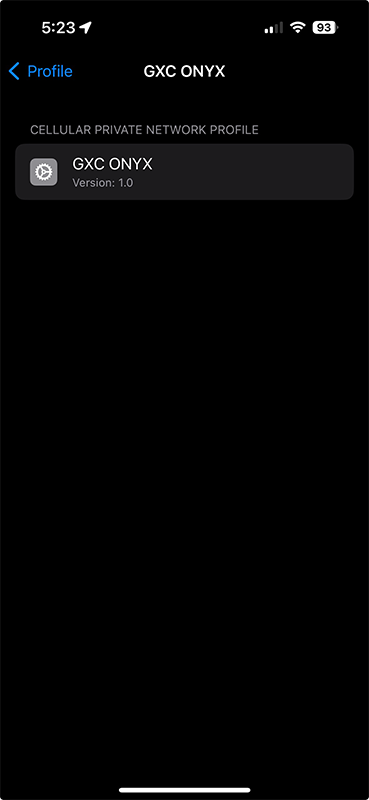
The GXC ONYX title is from the custom .mobileconfig file too. The code below sets that setting.
<key>DataSetName</key>
<string>GXC ONYX</string>
Conclusion
Since the iPhone has switched to eSIM only, it becomes a challenge to test out some of these settings. I don’t have eSIMs yet for any of my Private Cellular Networks. For my day job, we recently selected an eSIM vendor; so, I’ll be able to test this soon. When I get access to eSIMs, I’ll test out these settings in action.
Creating a .mobileconfig file and pushing it with an MDM allows you to customize the Private Cellular settings on Apple iOS 17 and iPadOS 17 devices. You can create Geofences, preferences for using Cellular Data over Wifi, and setting the device to 5G NR Standalone.