

Note: This week, I had the privilege of attending WLAN Pros Conference in Phoenix, AZ (#WLPC) where the WLAN Pi Pro was officially launched by the community. After some twitter discussions with @joshschmelzle, I’m going to install the WLAN Pi Pro software and then install the 5G Modem drivers and applications. When I get the new software installed, my CBRS Pi will officially become a WLAN Pi Pro Community Edition + 5G. I’ll create a new post about the experience.
The Software
My CBRS Pi is running Raspberry Pi OS Bullseye 32-bit kernel 5.10 (formerly known as Raspbian). I installed it with the GUI but the driver installation and most of the tools can be accomplished without the GUI. I attempted to install it with Ubuntu 64-bit and could get the 5G Modem driver to install but struggled to get the AX210 Wifi 6e Driver to work correctly. I haven’t attempted the install with the newly released 64-bit Raspberry Pi OS although the CM4 supports 64-bit.
https://www.waveshare.com/wiki/SIM8200EA-M2_5G_HAT
The documentation for the 5G Modem has instructions to run Open-WRT and building a router. I’ve been thinking about attempting an Open-WRT installation, but the Intel AX210 doesn’t support AP Mode so it would only work as a router for wired. In the future if we could find a different card that supports AP Mode, it would be cool to setup a Wifi 6e and 5G hotspot but the current Wifi radio doesn’t support it. The regulations and requirements for avoiding incumbents plus the fact the device has external antennas may make Wifi 6e in AP Mode not possible.
For installing the drivers for both the Intel AX210 and the 5G Modem, Raspberry Pi OS needs the Linux-Kernel-Headers installed. You can install them with this command:
$ sudo apt install raspberrypi-kernel-headers

Wifi 6e
Getting the Intel AX210 driver installation was definitely the hardest challenge of the entire project so far. The only instructions that worked for me that I found are here and are included below:
https://chowdera.com/2022/01/202201061800268558.html
To install the Intel AX210 driver, you have to install a backport driver. The Intel driver is called iwlwifi.
$ git clone https://git.kernel.org/pub/scm/linux/kernel/git/iwlwifi/backport-iwlwifi.git

Once you get the backport driver downloaded, the driver needs to be compiled.
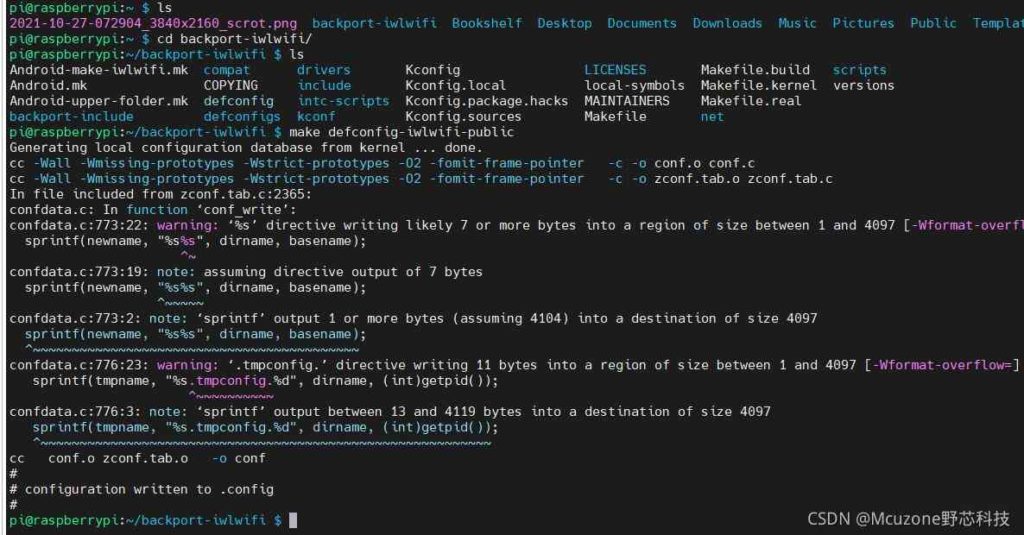
$ cd backport-iwlwifi
$ make defconfig-iwlwifi-public
$ sed -i ‘s/CPTCFG_IWLMVM_VENDOR_CMDS=y/# CPTCFG_IWLMVM_VENDOR_CMDS is not set/’ .config
The -j8 below sets the number of cores used to compile the driver. Depending on the device this may cause issue. The less number of cores will cause the compile to take longer. If it does cause issues, then reduce the number, or remove the flag altogether like in the screenshot below.
$ make -j8

Finally, you need to install the compiled driver with:
$ sudo make install

There is one additional step and piece of the driver that you need to install to get the 6Ghz driver working correctly. You need to download the Intel driver for the AX210 from Intel’s website here: https://www.intel.com/content/www/us/en/support/articles/000005511/wireless.html or run this command:
$ wget https://wireless.wiki.kernel.org/_media/en/users/drivers/iwlwifi-ty-59.601f3a66.0.tgz

Extract the tgz zipped file with:
$ tar -xvzf iwlwifi-ty-59.601f3a66.0.tgz
Then copy the following two files to the /lib/firmware folder using:
$ sudo cp iwlwifi-ty-a0-gf-a0-66.ucode /lib/firmware
$ sudo cp iwlwifi-ty-a0-gf-a0.pnvm /lib/firmware
# sync
#reboot

After the reboot, then you should then have a new wlan interface inside ifconfig. (This screenshots below shows the wlan0mon instead of plain wlan0 because it has been running in monitor mode for use with Wifi Explorer Pro, Airtool, or Wireshark. When the driver is initially installed, it shows as wlan0.)
# ifconfig

WLAN PI Applications
For the Wifi 6e applications, I am piggy backing off the WLAN Pi toolset, the work of our awesome Wifi Community, and the work of Adrian Granados.
WLAN Pi Github Applications
WLAN Pi Pro Release
https://github.com/WLAN-Pi/pi-gen/releases/tag/v3.0.0
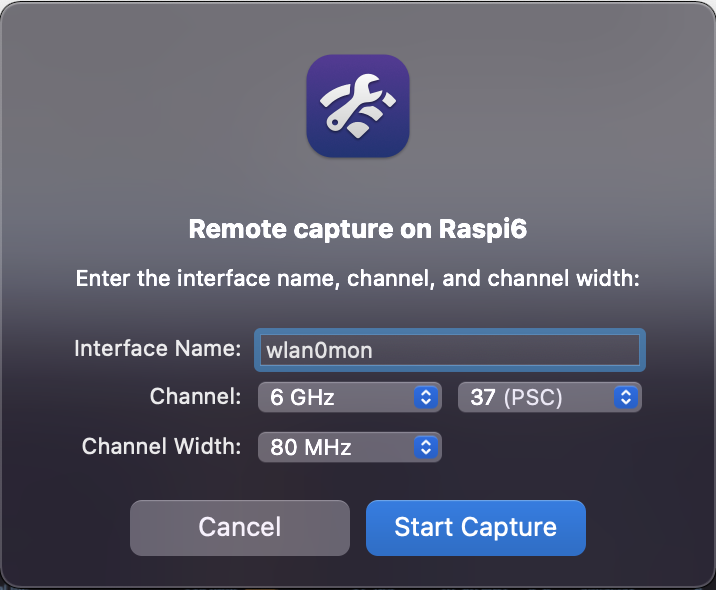
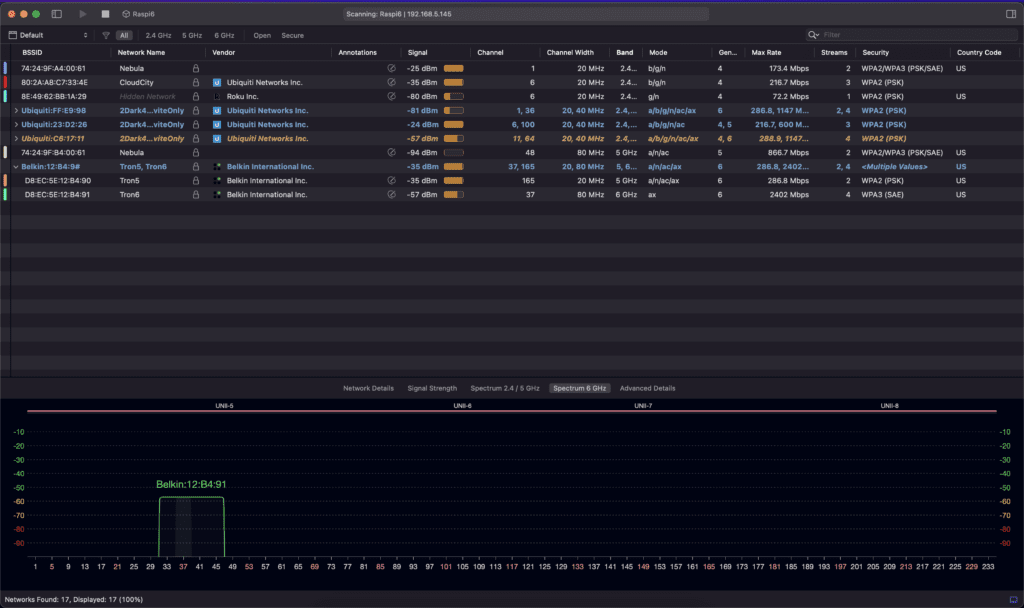
Wifi Explorer Pro 3 and Airtool 2 Remote Sensor
https://intuitibits.com/help/wifiexplorerpro3/#/topic-en.lproj-connect_remote_sensor
CBRS LTE/5G
Now onto the much easier installation of the Qualcomm Snapdragon X55 5G Modem driver and applications. Instructions from Waveshare for installing the drivers can be found here:
https://www.waveshare.com/wiki/SIM8200EA-M2_5G_HAT
$ sudo apt-get install p7zip-full
$ wget https://www.waveshare.com/w/upload/f/fb/SIM8200-M2_5G_HAT_code.7z
$ 7z x SIM8200-M2_5G_HAT_code.7z
$ sudo chmod 777 -R SIM8200-M2_5G_HAT_code
$ cd SIM8200-M2_5G_HAT_code
$ sudo ./install.sh
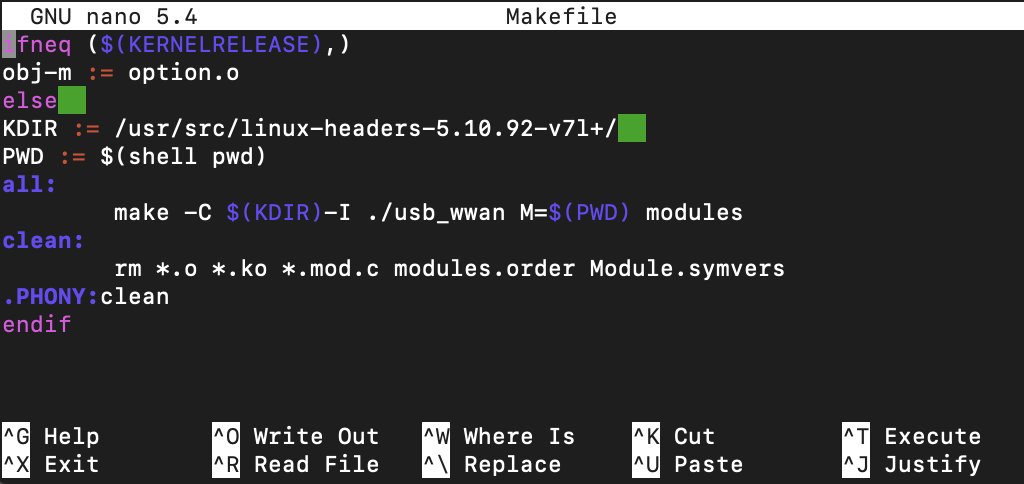
For me, the install.sh script didn’t work. Examining the install.sh script with nano, I was able to run the different pieces manually. The Makefile files in the two of the folders (option and qmi_wwan_simcom) have the wrong kernel header path. You need to run the uname -r command to get the current kernel version. Modify those Makefile files with nano to change the linux-headers path to the appropriate kernel version.
$ uname -r

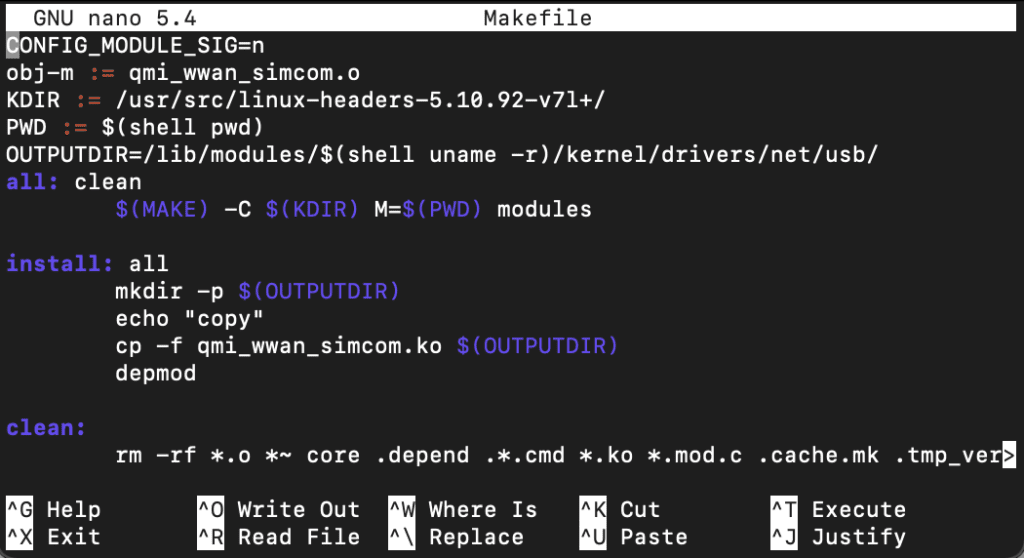
Edit the Makefile files with the correct kernel-header path (notice that the Goonline Makefile doesn’t reference the kernel version):
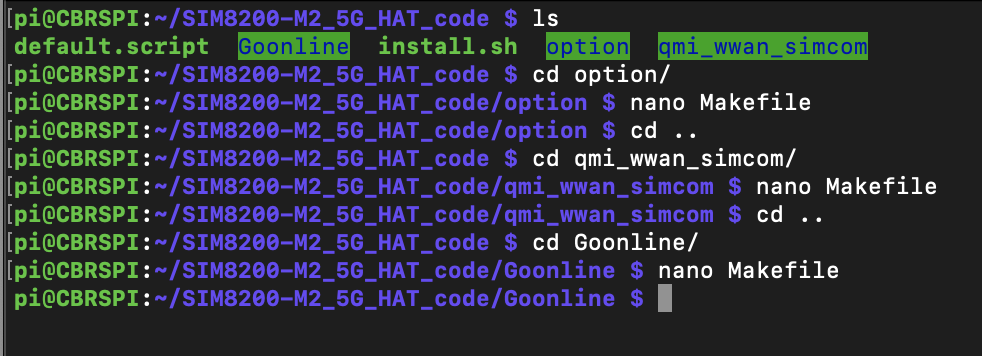
$ nano option/Makefile
$ nano qmi_wwan_simcom/Makefile
Then run sudo make to compile the driver three times inside of each folder (option, Goonline, and qmi_wwan_simcom) to install them.
$ sudo make


Once you have run the make in the option, Goonline, and qmi_wwan_simcom folders without any errors then you have the driver installed correctly. The final step is to run the application to start the connection to the LTE/5G network.
$ cd SIM8200-M2_5G_Hat_code/Goonline
$ sudo ./simcom-cm
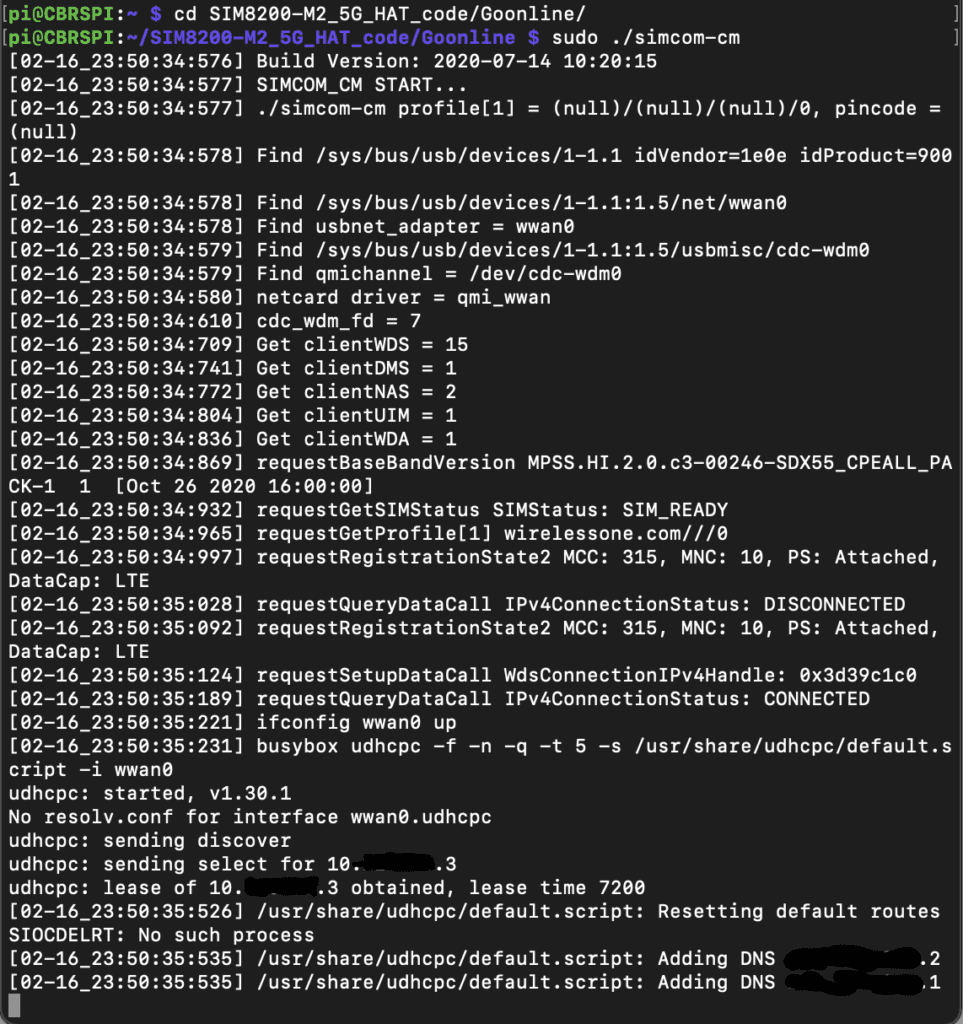
If you get the log showing “Adding DNS *.*.*.* then you have installed things correctly. The DNS and IPs should be assigned by Core and connected to the S-GW part of the Core.
Don’t close or kill the open window with the connected session. Closing the window will disconnect the connection to the LTE/5G network. If you are connected via ssh, then open a new ssh tab and connect into the Raspberry Pi with a second session. If you are logged directly into the device, you can open a web browser and start browsing the internet or an additional terminal session and ping devices. You should then be online. There are instructions on the Waveshare Wiki on how to make the simcom-cm script to run automatically but I haven’t got that working yet. I’ve just been running it manually when I want it to connect.
If you check ifconfig you should now have interfaces for both the AX210 wlan0 and for the 5G Modem wwan0.
The 5G Modem supports standard AT Modem Commands. To use the GPS, the Waveshare Wiki has instructions to get it working via the AT Commands. I have attempted to get it working but haven’t been successful yet. I’ve tried accessing it via Terminal but haven’t gotten any data returned via the sudo cgps -s command.
LTE/5G Applications
Now that we have the drivers installed for both the Wifi 6e card and 5G modem, we can start to test things out. I installed and ran several performance testing applications such as speedtest, iperf2 or 3, nload, vnstat, wireshark, tshark, and nmap. Those tools give various stats about network performance or other metrics that are useful when testing. A lot of these use cases are extending the power of the WLANPi. I’m looking for additional apps and ideas for how to use the CBRS Pi. I’m looking at IOT applications, a remote control car, a Pi Drone, and several other use case specific applications. I’ve tested the installation as a remote camera display running over CBRS by installing the DisplayCameras app and it works really well. I’m exploring additional use cases and ideas.
![Tutorial] Raspberry Pi 3 RTSP Stream Viewer | Ubiquiti Community](https://img.community.ui.com/d1823fa7-cb4b-4837-8c91-a1ceb77c242e/comments/d66cc6d5-efa2-4e57-90cb-08f419748e14/ab1c0584-cc5d-4ed1-b586-76552eaa8c5f)
My next post, I’ll dig into two killer use cases that will make the CBRS Pi more on par with the WLANPi community for troubleshooting the CBRS Network.