
Wifi HaLow or 802.11ah isn’t a necessarily new technology, it was first ratified in 2017. It is starting to gain popularity and interest because clients and APs are starting to become more widely available.
802.11ah or Wifi HaLow brings the Wifi standards and technology into the unlicensed ISM 900MHz band in the United States or 800MHz band in other countries such as Europe. Other technologies use these bands to achieve distances unheard of in the other Wifi bands, 2.4, 5, and 6GHz, from an Omni directional antenna. LoraWAN and other IOT technologies use these bands but at much lower data speeds.
UPDATE: Troy Martin gave an excellent presentation about Wifi HaLow 802.11ah at the WirelessLAN Professionals Conference (WLPC) in Phoenix. I highly recommend watching his presentation.
LoraWAN vs Wifi HaLow
LoraWAN operates with different protocols and talks with “Chirps” that are very short-small messages. LoraWAN operates with data speeds in the kilobits vs. megabits in Wifi and Cellular. These bands provides much great distances though. So LoraWAN has been viewed as providing long distances as its biggest strength. LoraWAN also allows for high power saving because the data speeds are so low. Batteries in LoraWAN devices can last up to 10 years.
Depending on the country, HaLow provides something that LoraWAN cannot. Like Wifi in other bands, you can bond channels together to achieve higher speeds. HaLow standards allow for combining the smallest 1 MHz wide channel into 2, 4, 8, or even 16 MHz wide channels. It also allows for higher power EIRP. In the United States, HaLow can use a max EIRP of 1000 mW or 1 Watt. Wifi in the other bands varies but is often in the 20-100mW level.

The only source I could find that talks about HaLow EIRP levels is this one that shares the above table. This is the same EIRP of LoraWAN. In the United States, LoraWAN allows up to 30dBm or 1 Watt. Wifi HaLow it seems allows that same EIRP; which makes sense as they are using the same spectrum.
Wifi HaLow Distance Testing
Recently, a group announced that they had performed some distance testing of Wifi HaLow at a beach. They achieve distances of up to 3 Kilometers or 1.86 miles. Using a Long Guard interval, allows for super long distances with HaLow compared to other Wifi bands.
I’m working on planning a new round of private cellular testing with a COW at the Salt Flats west of Salt Lake City in August. I’m also planning to bring my Wifi HaLow AP and client to do some distance testing on the Salt Flats. I’m also bringing my AP and Clients to WLPC in Phoenix next week. I’m thinking of installing it in the conference center and seeing if I get signal in my hotel room.
HaLow Hardware
I first heard about Wifi HaLow in 2020 and was reminded of it at WLPC Prague by Consuelo Ortiz from the Wi-Fi Alliance.
I decided I need to get my hands on some gear to see how the technology worked. I also wanted to see if I could capture PCAPs of the HaLow Frames.
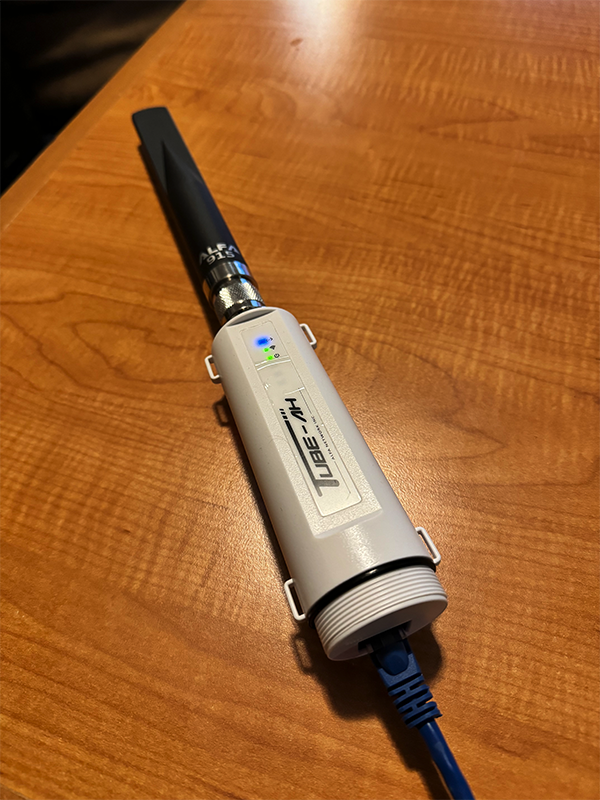
I started out by purchasing the Alfa HaLow Tube-AH AP:
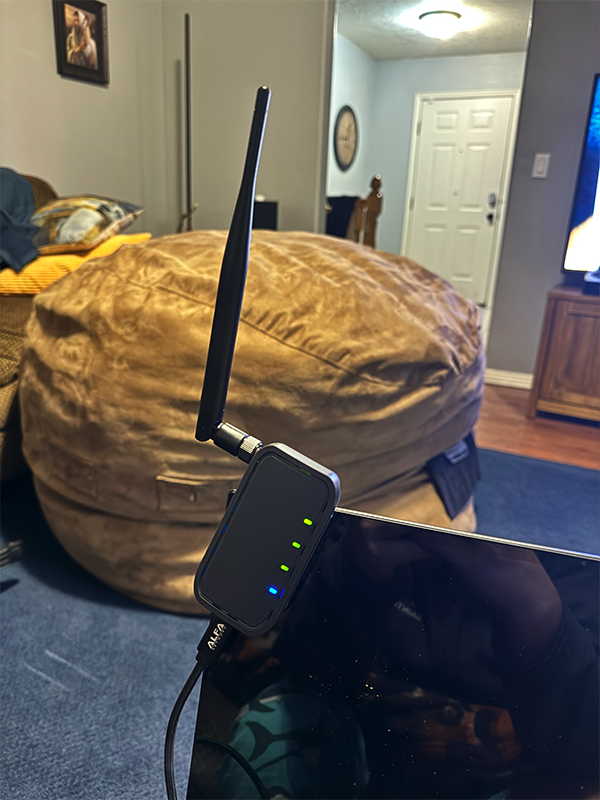
and the Alfa HaLow-U client:
Since the HaLow-U client connects with USB, I wondered if it would allow a way to capture packets. I quickly discovered that wasn’t possible.
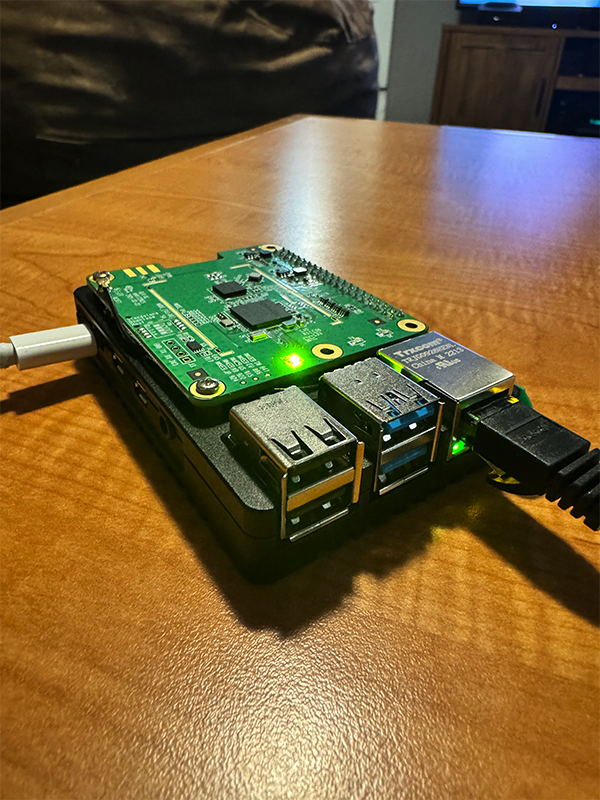
So, I decided to see if I could build a WLAN Pi like device to capture the HaLow frames. I purchased a Newracom NRC7292 WiFi HaLow Pi HAT. I’ll dig into more on that in a moment.
The Configuration
The Alfa Tube-AH AP and HaLow-U client are both running a version of OpenWRT.
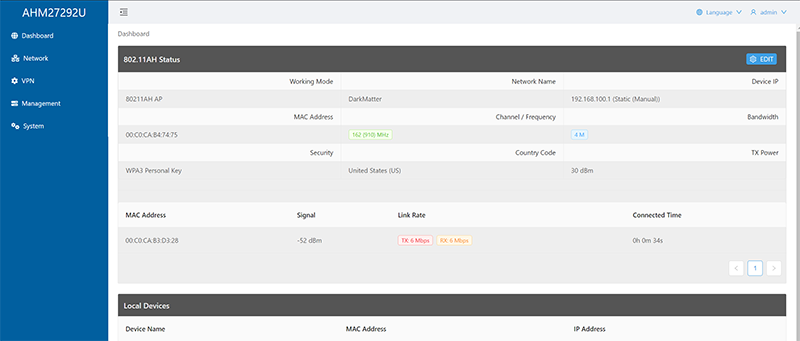
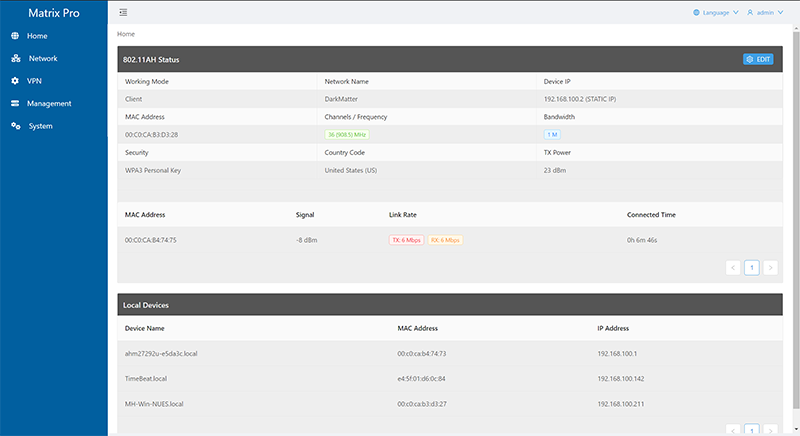
Below is the configuration page for the Tube-AH AP. Just like other Wifi devices, you set the SSID, in my example below “DarkMatter”. Set the country code. You set the Channel 162 (910 MHz) and Bandwidth (4MHz). The highest allowed bandwidth for these devices is 4MHz. These are unable to be configured to use 8MHz or 16MHz wide channels.
The Security options are familiar as other Wifi networks. These Alfa devices are only configured with either Open or WPA3-SAE. Looking at the configuration of my Raspberry Pi, other security methods like WPA2-PSK are allowed but these two devices are limited to Open or WPA3-SAE.
Other than setting the network IP, VPN, and a central management, that is pretty much all there is configure on the Halow Tube-AH AP. The HaLow-U Client is pretty much the same as you can see below. The one difference is you set it as a client instead of an AP. You can do Adhoc Wifi networks with two Alfa HaLow-U or two Alfa Tube-AH with one being set as an AP and the other as the client. In the client example below, it is set to Channel 36 (908.5MHz).
HaLow Speed Testing
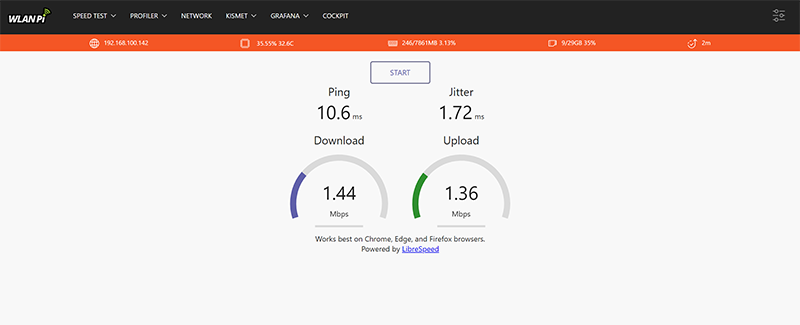
I first wanted to see how a 1 MHz wide channel performed. I connected a WLAN Pi to the ethernet port of the HaLow Tube-AH AP and connected the HaLow-U client over the Wifi. I opened the WLAN Pi Speed Test server in a browser and started a test. I got around 1.5 Mbps up and down over multiple tests.
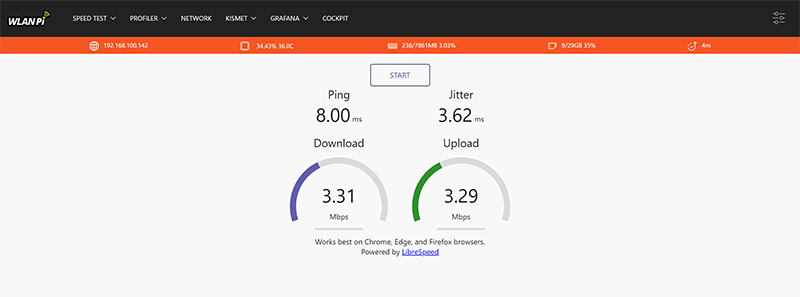
I then wanted to test the higher 4MHz wide channel. I change both the AP and Client to use 4MHz and repeated the WLAN Pi Speed Test. Moving from a 1MHz channel to a 4MHz channel, the speed slightly more than doubled to around 3.3Mbps. I was expecting a little better improvement than that.
As I mentioned before, these speeds are way higher than LoraWAN using the same band of spectrum.
Wifi HaLow Raspberry Pi Installation
Finally, my last testing was to see if I could capture the Wifi Frames. Right at the time I was looking at this, there was a discussion about HaLow on the Kismet Discord server. Currently, Kismet doesn’t support HaLow; although they are looking to add support eventually. That meant I had to look else where.
My first attempt, I tried to install the Newracom Drivers on top of a WLAN Pi OS image and a DragonOS image. Neither worked. I couldn’t get the drivers to work. I soon discovered that the Drivers are really fragile right now for the NewraCom HaLow Pi HAT.
I soon found on Alfa’s website an image for at WLAN Pi 4 that has the drivers already installed. It is a very old version of Raspberry Pi OS. The documentation on Alfa’s website says to not install the updates of the OS Image. That documentation provides full details to get the image installed on the Raspberry Pi.
Once I had the OS installed with the correct drivers, I found that there was other issues with the image. I had to go through the configuration files and modify them. My first attempt to start the client connection to the Tube-AH AP, I got errors about wireshark-gtk. I soon discovered that if I changed every entry in the configuration files to just wireshark from wireshark-gtk. Once I made that small change, the client connected to the AP.
Wifi HaLow Sniffer PCAPs
Going back to the documentation on Alfa’s website, it shows how to start the Pi HAT as an AP, Client, or Sniffer. The Driver has a built in Sniffer for capturing PCAPs! No need to user Kismet, although it would be cool to build this into the WLAN Pi R4.
An explanation of the different settings are found here:
Usage:
    start.py [sta_type] [security_mode] [country] [channel] [sniffer_mode]
    start.py [sta_type] [security_mode] [country] [mesh_mode] [mesh_peering] [mesh_ip]
Argument:
    sta_type      [0:STA   |  1:AP  |  2:SNIFFER  | 3:RELAY |  4:MESH]
    security_mode [0:Open  |  1:WPA2-PSK  |  2:WPA3-OWE  |  3:WPA3-SAE | 4:WPS-PBC]
    country       [US:USA  |  JP:Japan  |  TW:Taiwan  | EU:EURO | CN:China |
                   AU:Australia  |  NZ:New Zealand]
    -----------------------------------------------------------
    channel       [S1G Channel Number]   * Only for Sniffer
    sniffer_mode  [0:Local | 1:Remote]   * Only for Sniffer
    mesh_mode     [0:MPP | 1:MP | 2:MAP] * Only for Mesh
    mesh_peering  [Peer MAC address]     * Only for Mesh
    mesh_ip       [Static IP address]    * Only for Mesh
Example:
    OPEN mode STA for US                : ./start.py 0 0 US
    Security mode AP for US                : ./start.py 1 1 US
    Local Sniffer mode on CH 40 for Japan  : ./start.py 2 0 JP 40 0
    SAE mode Mesh AP for US                : ./start.py 4 3 US 2
    Mesh Point with static ip              : ./start.py 4 3 US 1 192.168.222.1
    Mesh Point with manual peering         : ./start.py 4 3 US 1 8c:0f:fa:00:29:46
    Mesh Point with manual peering & ip    : ./start.py 4 3 US 1 8c:0f:fa:00:29:46 192.168.222.1
Note:
    sniffer_mode should be set as '1' when running sniffer on remote terminal
    MPP, MP mode support only Open, WPA3-SAE security mode
To start the Raspberry Pi HAT as an AP, enter this code. The first digit is the type (1 = AP), the second is the security mode (0 = Open), then the Country Code.
~/nrc_pkg/script/start.py 1 0 USTo stop the AP, Client, or Sniffer enter this code:
~/nrc_pkg/script/stop.pyYou configure the settings for the AP or Client such as SSID, and Security in the specific configuration file in the ~/nrc_pkg/script/conf/US/ folder. Configuration settings are in these files:

To start the Raspberry Pi HAT as a Client change the first digit to a 0. First digit 0 = Station, second digit 1 = WPA2-PSK, then the country code.
~/nrc_pkg/script/start.py 0 1 USTo start the built in Sniffer, run the code below. The first digit 2, tells it to do the Sniffer. The second digit 3 tells it to use WPA3-SAE followed by the country code (although in Sniffer mode the security mode doesn’t actually do anything), the 116 tells it the channel to use for sniffing, and the last digit sets the sniffer mode for either local or remote sniffing.
~/nrc_pkg/script/start.py 2 3 US 116 0You can’t run this from just the CLI though. You have to use a VNC Client or directly attached monitor to login to the desktop of the Raspberry Pi. Then open a terminal and run this command. The script then enables monitor mode on the wlan0 interface, and it will open Wireshark. The reason for using the desktop through VNC goes back to the issues with the code containing wireshark-gtk. Changing the configuration to use wireshark, requires opening the full wireshark desktop app like below.
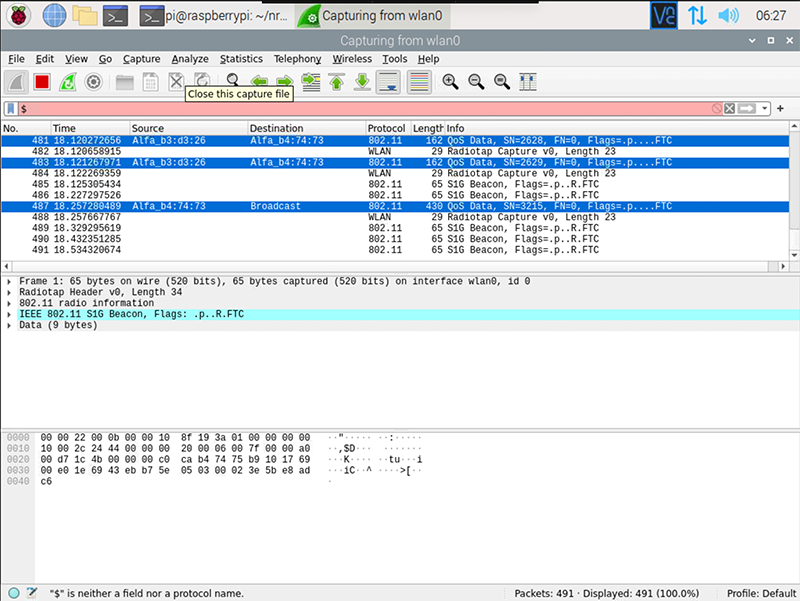
Once you are finished you can stop Wireshark and save the file wherever you want from within the VNC Desktop.
Wifi HaLow Frames Types
Now that we have a HaLow PCAP, let’s dig into the details. Hans Van Ballaer wrote a couple detailed blog post about the S1G Beacon Frame and the S1G Association Control Frames.
I won’t dig deeply into those as he explains them way better than I can. I will say that they are slightly different than the versions in Wifi 2.4, 5, and 6GHz bands.
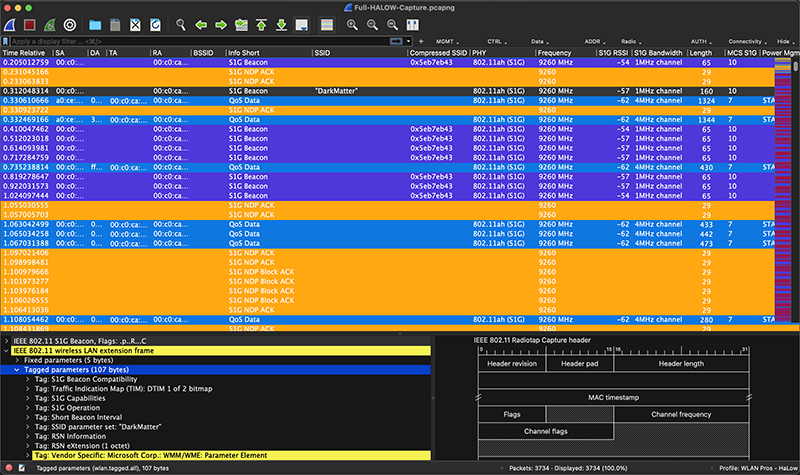
There are two versions of the S1G Beacon, the long and short version. Every so often, the full Beacon is broadcast that has the full SSID, otherwise a short version is sent out with a Compressed SSID. The S1G Beacons (long or short) go out in the same time frame as Beacons in the other bands which is around 10 times per second.
Wireshark Color Rules
If you are using the Wi-Fi Pros Master Color Rules, the S1G Beacon identifies at an Association Response frame if you are using a Colorization Rules that hasn’t been updated for HaLow. The S1G NDP Control Frames such as S1G ACKs and Block ACKs won’t have colors identified. Everything else seems to carry across from the other bands.
I added the following Color Rules, Filter Buttons, and Column Headers to the WiFi Pros Master Color Rules to get the Wireshark look above. Add these to your own Color Rules as you like.
Color Rules

S1G Beacon wlan.fc.type_subtype == 0x31 Purple (same as Beacon)
S1G NDP CTS radiotap.s1g.ndp.type == 0x0 Dark Orange (same as CTS)
S1G NDP PS-Poll radiotap.s1g.ndp.type == 0x1 Lite Orange (same as ACK)
S1G NDP ACK radiotap.s1g.ndp.type == 0x2 Lite Orange (same as ACK)
S1G NDP PS-Poll-ACK radiotap.s1g.ndp.type == 0x3 Lite Orange (same as ACK)
S1G NDP Block ACK radiotap.s1g.ndp.type == 0x4 Lite Orange (same as ACK)
S1G NDP Beamforming Report Poll radiotap.s1g.ndp.type == 0x5 Lite Orange (same as ACK)
S1G NDP Paging radiotap.s1g.ndp.type == 0x6 Lite Orange (same as ACK)
S1G NDP Probe Request radiotap.s1g.ndp.type == 0x7 Lite Orange (same as ACK)

Filter Buttons

MGMT//-  S1G Beacons wlan.fc.type_subtype == 0x31
CTRL//All S1G NDP Control radiotap.s1g.ndp.control == 0x04
CTRL//-  S1G NDP ACK radiotap.s1g.ndp.type == 0x2
CTRL//-  S1G NDP Block ACK radiotap.s1g.ndp.type == 0x4
CTRL//-  S1G NDP CTS radiotap.s1g.ndp.type == 0x0
CTRL//-  S1G NDP PS-Poll radiotap.s1g.ndp.type == 0x1
CTRL//-  S1G NDP PS-Poll-Ack radiotap.s1g.ndp.type == 0x3

Column Headers

Compressed SSID Type: Custom Fields: wlan.s1g.compressed_ssid
PHY Type: Custom Fields: wlan_radio.phy
S1G RSSI Type: Custom Fields: radiotap.s1g.rssi
S1G Bandwidth Type: Custom Fields: radiotap.s1g.bandwidth
MCS S1G Type: Custom Fields: radiotap.s1g.mcs
Wifi HaLow Use Cases
Ultimately, Wifi HaLow is an exciting new Wifi version to play with. There are some possible use cases where HaLow may be more beneficial than LoraWAN, 5G/LTE, or Wifi in the other bands. I recently saw this article from RCR Wireless that explains some good use cases that I won’t dig into in this post.
Conclusion
It is exciting to see this new technology in use. Just like my Cellular PCAPs, I’ve learned that you don’t really understand how a wireless technology works unless you can dig into the frames and HaLow is no different.
Just playing with the PCAPs expanded my understanding of Wifi HaLow or 802.11ah. I’m planning to bring this equipment to WLPC Phoenix next week. I’m also hoping to keep playing with the Newracom Drivers and possibly porting them into the WLAN Pi Project. It would also be cool if we could get official sniffer support for Kismet and other tools. As I said at the beginning, HaLow isn’t a new technology, but it has had a slow development cycle. There is a place in the Wireless world for Wifi in the Sub 1 GHz range and HaLow is filling that need.